The whole Robe really only has a handful of seams, all the shape comes from those pleats. So it was easy enough to sew everything together, but a real pain to try and press the pleats in nicely ;)

The silk i am making this out of really wanted to fray at the edges and i hate having a gown not last because the fabric frays right through your seam allowances and through the seam! and even though i have a serger now to help prevent that I'm just not totally comfortable using it yet. So i cut out the pieces with pinking shears and then did french seams for the few seams that make up the Robe. The top edges on both the front and back were salvage edges just due to how they were cut out but i still covered both pieces with a self fabric binding and then set them together. I also did all the internal seams that i feel comfortable wont be seen on the sewing machine to make things go faster and then did all the external seams by hand.
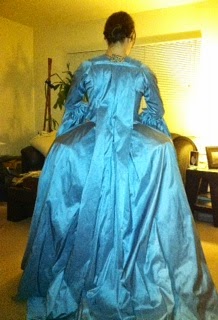
I wasn't sure if i wanted to wear this over my big pocket panniers but wanted to have good deep pleats at the hips and so as a result the robe really looks best on the bigger panniers. In these photos you can see the bones of the panniers because i don't have a good heavy petticoat over them. I will be making a "quilted" petticoat for this dress that can also be worn with the curtain along dress, this one will be made to go over the panniers, where as the first one was round and meant for a hoop.
The internal pleats are stitched together to help hold their shape when on a body, and i added ties to help bring the sides in just a little tighter to really emphasis the narrow waist under all those pleats. I have to admit that i am going a little nutty trying to make this rather free formed gown fitted, as i am terrified that i will look pregnant (which i am not) in this gown, as that is often what it is recommend for.

The sleeve finishing per the pattern, and most of the originals, should have been rather large cuffs, and i did start out with the intent to make those cuffs but i really thought the look was goofy so i started messing around with the idea of a scalloped sleeve flounce, i was using this original gown as my inspiration for that idea:

This was the result!

open flat it kind of reminds me of a creepy flower ;)

regardless of that i am really happy with how they came out :) Then to cover the seam where i attached the flounce i made this little box pleated trim.

regardless of that i am really happy with how they came out :) Then to cover the seam where i attached the flounce i made this little box pleated trim.

I had to lay the dress out on the floor to press in the pleats as i need a very long very flat surface to really get them to lay straight and to my liking and the ironing board just wasn't cutting it! very silly i know but, hey it worked :)

The hem still needs to be set but i am not far off at all and will really just need to roll back up the salvage edge.
And then its just the accessories and few finishing touches such as I think i will be making white cotton under sleeve flounces to go with the outer flounce like on this original gown:

And i will need a little ruffle, probably of the same material as the under sleeves to set along the top edge of the gown to cover my tattoo in the back ;)

Lovely! Go you!
ReplyDeleteThank you!!!!
ReplyDeleteNeat! I don't know that I've really seen one of these attempted before but it's nice to know there are not a ton of seams involved (just a whole carnival tent's worth of fabric, wow). It turned out really pretty!
ReplyDeleteYes couldn't remember that I had seen one done either which was why I wanted to try it.
DeleteAnd it most definitly is a whole carnival tents worth of fabirc, worthy of the Russian circus I am sure :)
It turned out so well!
ReplyDeleteThank you!
DeleteAnd thank you for all your help getting me started and pointed in the right direction!