As you can probably tell from my lack of posting the fair is keeping me very busy! What with all the traveling and long days AND a normal 9-5 job I haven't had time for anything else including sewing.
But I am having an absolute blast again!! :)
There's not a lot of pictures to show for all the fun I am having, as I am too busy to stop and remember to take photos, so any photos are coming from other people that Michael finds on Facebook :)Here is one of my friend Laura and I. I'm wearing the new silver dress and she is wearing my new plaid skirt and the Spanish jacket and waistcoat from last year. It's fun having someone my size to raid my closet and help me wear all my stuff ;)
Monday, December 17, 2012
Friday, November 30, 2012
The Start of Dickens Fair
Was last weekend, and it was a blast. The first weekend is always 3 days as we do the Friday after thanksgiving as well as the weekend. The first couple of weekends are my favorites as the crowds are a little thinner making it easier to walk around, and we all still have the energy to run around :)
Aside from a good start to the fair i also got to meet two wonderful fellow bloggers for the first time! Maggie of http://serendipitousstitchery.blogspot.com and Lauren of
http://americanduchess.blogspot.com they are both wonderful women and amazing costumers. We got the opportunity on the last day to sit down and chat for awhile along with my friend Nicole of http://austrianwoman.blogspot.com, which was just so much fun, so rarely do I get to sit with such creative and like minded people and enjoy such great conversation.
For the weekend I wore my new plaid skirt with various shawls and jackets. I have a large black velvet cape from last year as well as the new short military inspired jacket I made this year, though that one didn't last very long as I caught one of the braid loops and it tore so now I have some repair work to do before I can wear it again, which I most certainly will. And I did get to make lots of good use out of my new paisley shawl.
Michael wore his Scottish kit. I love his Argyl and Sutherland Highlanders uniforms, the plaid is beautiful and it has so many little details and accessories, my favorite accessory being his badger sporran which I have named spot ;) and what girl doesn't love a man in a kilt? Right ;)
Michael wears a different regiment every weekend so this weekend will be the King's Royal Rifle Corp and I will wear my red silk from last year.
Aside from a good start to the fair i also got to meet two wonderful fellow bloggers for the first time! Maggie of http://serendipitousstitchery.blogspot.com and Lauren of
http://americanduchess.blogspot.com they are both wonderful women and amazing costumers. We got the opportunity on the last day to sit down and chat for awhile along with my friend Nicole of http://austrianwoman.blogspot.com, which was just so much fun, so rarely do I get to sit with such creative and like minded people and enjoy such great conversation.
For the weekend I wore my new plaid skirt with various shawls and jackets. I have a large black velvet cape from last year as well as the new short military inspired jacket I made this year, though that one didn't last very long as I caught one of the braid loops and it tore so now I have some repair work to do before I can wear it again, which I most certainly will. And I did get to make lots of good use out of my new paisley shawl.
Michael wore his Scottish kit. I love his Argyl and Sutherland Highlanders uniforms, the plaid is beautiful and it has so many little details and accessories, my favorite accessory being his badger sporran which I have named spot ;) and what girl doesn't love a man in a kilt? Right ;)
Michael wears a different regiment every weekend so this weekend will be the King's Royal Rifle Corp and I will wear my red silk from last year.
Tuesday, November 27, 2012
Ancient underwear
Or at least that's what my sister calls it when I make period undergarments. In this case though it is more of an over garment for said undergarments.
As creative procrastination I decided to make a short robe/ boudoir jacket to go with my new chemise and drawers for Dickens this year (mind you the chemise and drawers are still sitting in pieces in the sewing room, that's the level of creative procrastination I have attained ;).
I based the jacket off of this fashion plate drawing from my harpers bazaar book.
To avoid having it look like part of a wedding trousseau I added the purple accents to it. And the lace trim is actually 3 different trims put together :)

The sleeves are definitely my favorite part, open and flowy like the fashion plate.
Okay now back to real work ;)
As creative procrastination I decided to make a short robe/ boudoir jacket to go with my new chemise and drawers for Dickens this year (mind you the chemise and drawers are still sitting in pieces in the sewing room, that's the level of creative procrastination I have attained ;).
I based the jacket off of this fashion plate drawing from my harpers bazaar book.
To avoid having it look like part of a wedding trousseau I added the purple accents to it. And the lace trim is actually 3 different trims put together :)

The sleeves are definitely my favorite part, open and flowy like the fashion plate.
Okay now back to real work ;)
Wednesday, November 21, 2012
Lining the Hats
My part of McPherron and Sons hats was the quilted linings. The linings are made of silk with a thin wool batting for the quilted part.
We chose to go with the diamond pattern as it seemed to be the most common reoccurring theme in the photos of originals Michael has collected. And it was relatively easy to make as the pattern was continuous.
Previously michael had used custom woven labels on the inside but the originals seem to be stamped or embossed with the makers mark. And since you can find anything online now, I figured we could find a place to custom make us a stamp with his logo and then apply it to the lining using a metallic gold fabric paint. And sure enough we were able to do all that! Making the custom stamp online was ridiculously easy, and the fabric paint came from dharma trading company online as well.
The really hard part of the whole thing was getting the stamp to apply right, it took a lot of finagling with ink application and pressure and a lot of practicing on my part :)
The end result is truly very stunning which is a great match for the very stunning hats he makes. And it was a lot of fun to be a part of the process this time :)
We chose to go with the diamond pattern as it seemed to be the most common reoccurring theme in the photos of originals Michael has collected. And it was relatively easy to make as the pattern was continuous.
Previously michael had used custom woven labels on the inside but the originals seem to be stamped or embossed with the makers mark. And since you can find anything online now, I figured we could find a place to custom make us a stamp with his logo and then apply it to the lining using a metallic gold fabric paint. And sure enough we were able to do all that! Making the custom stamp online was ridiculously easy, and the fabric paint came from dharma trading company online as well.
The really hard part of the whole thing was getting the stamp to apply right, it took a lot of finagling with ink application and pressure and a lot of practicing on my part :)
The end result is truly very stunning which is a great match for the very stunning hats he makes. And it was a lot of fun to be a part of the process this time :)
Tuesday, November 20, 2012
McPherron and Sons Hats
So this post has absolutely nothing to do with me but will help give background to tomorrows post.
Michael makes reproduction Victorian military hats for himself and fellow re-enactors and this time of year is usually when he is most busy with it as many of the hats are for the Dickens fair.
This is a picture of one of his reproductions:
And for your reference this is of the original hat from the Victorian era, complete with it's original tin:
Michael puts a lot of work into each of his hats. The foundation is made of wired double buckram sides and leather top all hand stitched together. The wool covering stretched taut and smooth and the gold braid is all very carefully laid out and tacked down. The inside is lined in quilted silk with a real leather hat band.
Michael makes reproduction Victorian military hats for himself and fellow re-enactors and this time of year is usually when he is most busy with it as many of the hats are for the Dickens fair.
This is a picture of one of his reproductions:
And for your reference this is of the original hat from the Victorian era, complete with it's original tin:
Michael puts a lot of work into each of his hats. The foundation is made of wired double buckram sides and leather top all hand stitched together. The wool covering stretched taut and smooth and the gold braid is all very carefully laid out and tacked down. The inside is lined in quilted silk with a real leather hat band.
Monday, November 19, 2012
New Sewing Kit
I really wanted a new sewing kit for Dickens this year, last year I had a small sewing basket that quickly turned into a disaster during the run of fair. My original idea was to collect and compile a chatelaine with the sewing tools I would need but though I have been able to gather a few pieces here and there, there is still too much missing to make it a useable kit.
The next idea that I have gone with came from a blog that I follow: Dressed In Time (http://dressedintime.blogspot.com/?m=1) is a wonderfully fabulous blog mostly focused in the 18th century though she does do a little bit of everything else and she is an amazing seamstress.
Earlier this year she made herself a beautiful silk and embroidery sewing kit, based on an original 18th century one in a museum.
http://dressedintime.blogspot.com/2012/06/pretty-new-sewing-kit.html?m=1
The kit is really much like a book with an inner pocket for tools, a felt for holding needles and a little pin cushion, that folds and ties closed with a ribbon.
I followed Dressed In Times directions closely from her blog, using cardboard to stiffen the sides, adding a drawstring to the pocket, and closing it with a ribbon tie.
I didn't embroider mine for three reasons: one my embroidery is awful, two i made this out of a silk velvet with a rather tall nap, and three I did the whole thing in a few hours over morning coffee. Most of it was hand sewn together with just a few pieces set using the machine. I made it the size of a standard paper back book so it fits nicely into my basket or for now into my purse. In it I can carry needles, pins, small scissors, a seam ripper, a few thin spools of thread, wax, and my ever handy bag of safety pins.
I am so happy with how the little kit turned out! And am already using it for sewing I am doing now in preparation for Dickens (yes i sit and sew during my lunch at work), it's easy to take, doesn't take up too much room and is already stocked with everything I need.
I take absolutely no credit for this project and give all due credit to Dressed In Time for both inspiration and idea, she solved my sewing kit problem with her project and provided direction on how to make it. Thanks!!
The next idea that I have gone with came from a blog that I follow: Dressed In Time (http://dressedintime.blogspot.com/?m=1) is a wonderfully fabulous blog mostly focused in the 18th century though she does do a little bit of everything else and she is an amazing seamstress.
Earlier this year she made herself a beautiful silk and embroidery sewing kit, based on an original 18th century one in a museum.
http://dressedintime.blogspot.com/2012/06/pretty-new-sewing-kit.html?m=1
The kit is really much like a book with an inner pocket for tools, a felt for holding needles and a little pin cushion, that folds and ties closed with a ribbon.
I followed Dressed In Times directions closely from her blog, using cardboard to stiffen the sides, adding a drawstring to the pocket, and closing it with a ribbon tie.
I didn't embroider mine for three reasons: one my embroidery is awful, two i made this out of a silk velvet with a rather tall nap, and three I did the whole thing in a few hours over morning coffee. Most of it was hand sewn together with just a few pieces set using the machine. I made it the size of a standard paper back book so it fits nicely into my basket or for now into my purse. In it I can carry needles, pins, small scissors, a seam ripper, a few thin spools of thread, wax, and my ever handy bag of safety pins.
I am so happy with how the little kit turned out! And am already using it for sewing I am doing now in preparation for Dickens (yes i sit and sew during my lunch at work), it's easy to take, doesn't take up too much room and is already stocked with everything I need.
I take absolutely no credit for this project and give all due credit to Dressed In Time for both inspiration and idea, she solved my sewing kit problem with her project and provided direction on how to make it. Thanks!!
Thursday, November 8, 2012
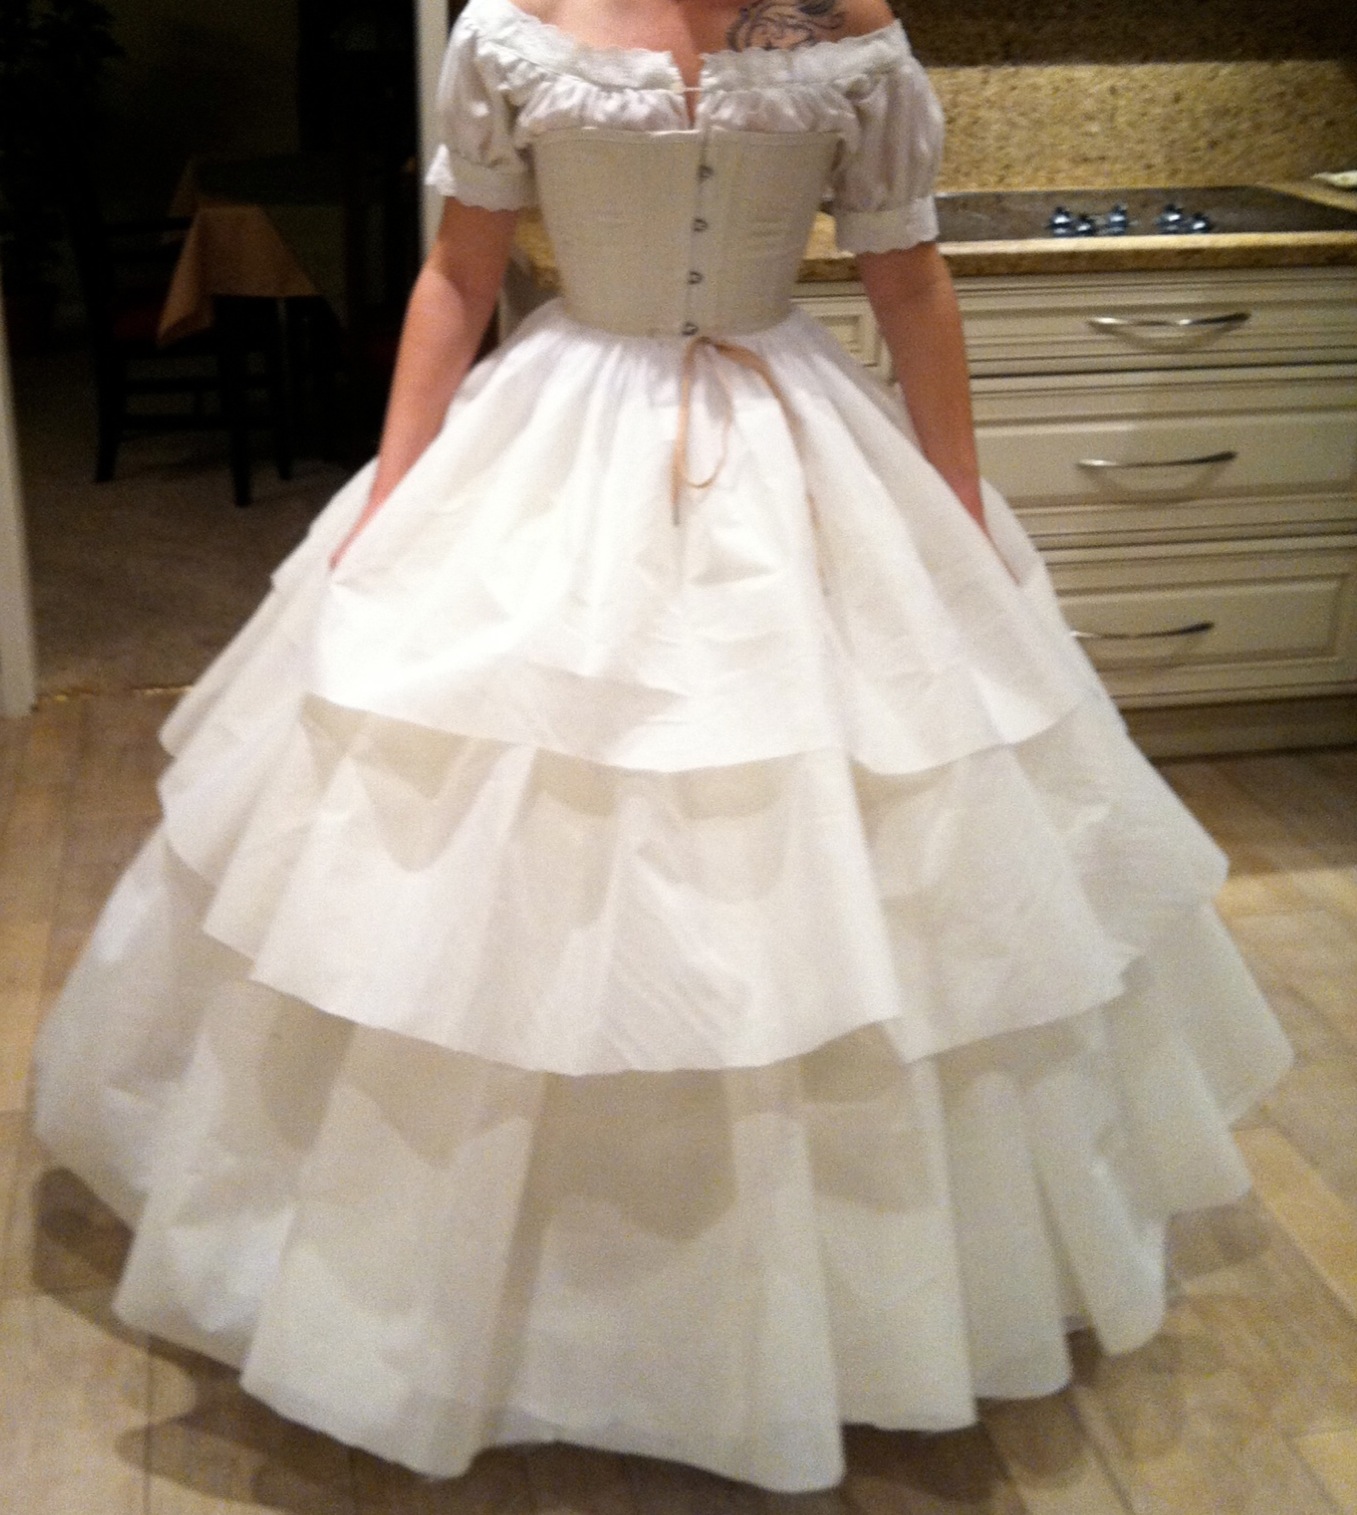
Ruffled Petticoat
Last year I was very happy with the foundation I created for my Dickens Fair dresses. I had my chemise and bloomers, corset and hoop and a ruffled petticoat and an eyelet lace petticoat.
The ruffled petticoat was very good for eliminating the lampshade effect that can happen with hoops and gave the skirts a nice belled shape. But the ruffled petticoat had been a last minute slap shod creation that barely survived the run of dickens fair so for this year I made a new one.
I used the Truly Victorian pattern for the flounced skirt. I made all four flounces and used a very light weight (shhh, poly cotton blend) fabric, to reduce weight and unnecessary bulk. The pattern is very simple, but the construction was time consuming! All that yardage that I had to finish the edge of and then gather and then put on the foundation! It was a lot for me but then again I have never really had the patience for ruffles.
But don't get me wrong it was totally worth it! The skirt looks great, it's ten times better then the original I made and is exactly what I had in my head when I was considering a ruffled petticoat :)
The ruffled petticoat was very good for eliminating the lampshade effect that can happen with hoops and gave the skirts a nice belled shape. But the ruffled petticoat had been a last minute slap shod creation that barely survived the run of dickens fair so for this year I made a new one.
I used the Truly Victorian pattern for the flounced skirt. I made all four flounces and used a very light weight (shhh, poly cotton blend) fabric, to reduce weight and unnecessary bulk. The pattern is very simple, but the construction was time consuming! All that yardage that I had to finish the edge of and then gather and then put on the foundation! It was a lot for me but then again I have never really had the patience for ruffles.
But don't get me wrong it was totally worth it! The skirt looks great, it's ten times better then the original I made and is exactly what I had in my head when I was considering a ruffled petticoat :)
Monday, November 5, 2012
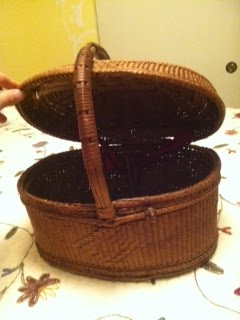
A Tis Kit a Tas Kit
. . . A really old basket ;)
For Dickens of course, a small covered basket was a commonly carried item by a lady especially if she was out shopping. So this will be mine, an eBay find of course.
I like that it is old and kinda battered, I feel like it gives it a certain authenticity versus a new shiny clean basket that looks fresh and never used, silly I know :)
For Dickens of course, a small covered basket was a commonly carried item by a lady especially if she was out shopping. So this will be mine, an eBay find of course.
I like that it is old and kinda battered, I feel like it gives it a certain authenticity versus a new shiny clean basket that looks fresh and never used, silly I know :)
Friday, November 2, 2012
Black Velvet Jacket
This jacket was really more about creatively procrastinating than anything else :) I needed to fit the bodice portion of a pattern for a full length fitted dress and so I just worked with short pieces to make it easier. And after I had my new fitted pattern it seemed a waste to not do anything with the fabric I had used for the fitting so I cut it out in velvet and made this short jacket, rather then start on the full length dress :)
As it is a jacket and meant to be taken off, I made sure all my inside seams were hidden which meant a lot of futzing and tight sewing, but I made it work. The decoration idea came from Michaels military collection. I loved the swaged braiding that was common on some military coats of the Victorian era and used that style for my coat.
The swags are attached on one side and unhook from the other. And I used large velvet covered buttons for the swag ends. The buttons up the front are just larger versions of the woven buttons from the silver dress.
And for a little more detail I added the little knotted braid to the sleeves.
I'm kind of going with a military theme for this years dickens outfits. The full length dress I mentioned above will also have military inspired decoration :)
As it is a jacket and meant to be taken off, I made sure all my inside seams were hidden which meant a lot of futzing and tight sewing, but I made it work. The decoration idea came from Michaels military collection. I loved the swaged braiding that was common on some military coats of the Victorian era and used that style for my coat.
The swags are attached on one side and unhook from the other. And I used large velvet covered buttons for the swag ends. The buttons up the front are just larger versions of the woven buttons from the silver dress.
And for a little more detail I added the little knotted braid to the sleeves.
I'm kind of going with a military theme for this years dickens outfits. The full length dress I mentioned above will also have military inspired decoration :)
Tuesday, October 30, 2012
A Christmas Plaid
In the spirit of Christmas, for Dickens this year I thought it would be nice to have a little holiday plaid. So I have added this lovely green, gold, maroon to the collection.
As it is real silk and there for expensive I only purchased enough for just a skirt, and will just match it with one of my black velvet jackets and blouses.
I like 1850's skirts because for the most part they can be ridiculously simple just one seam to close the circle, another seam for the waistband and then a long running stitch to cartridge pleat the width into the waistband. Which I do all by hand, usually while watching tv, cause I'm crazy like that ;)
The other trick I have taken to doing is instead of cutting off any excess material from the length I pleat it up a foot above the hem length so that as I wear out the bottom edge of skirt I can just let out the pleat, roll under the frayed hem and re set the pleat just a bit smaller, it can really extend the life of a skirt especially one that is worn out of doors and gets plenty of wear and tear at re-enactments.
The technique is not original to me and was most commonly used in children's clothing to extend the wear of a garment by allowing the length to grow with the child. This usually involved several rows of smaller pleats that could be let out one at a time and then conversely taken back up when the garment moved down to the next child.
As it is real silk and there for expensive I only purchased enough for just a skirt, and will just match it with one of my black velvet jackets and blouses.
I like 1850's skirts because for the most part they can be ridiculously simple just one seam to close the circle, another seam for the waistband and then a long running stitch to cartridge pleat the width into the waistband. Which I do all by hand, usually while watching tv, cause I'm crazy like that ;)
The other trick I have taken to doing is instead of cutting off any excess material from the length I pleat it up a foot above the hem length so that as I wear out the bottom edge of skirt I can just let out the pleat, roll under the frayed hem and re set the pleat just a bit smaller, it can really extend the life of a skirt especially one that is worn out of doors and gets plenty of wear and tear at re-enactments.
The technique is not original to me and was most commonly used in children's clothing to extend the wear of a garment by allowing the length to grow with the child. This usually involved several rows of smaller pleats that could be let out one at a time and then conversely taken back up when the garment moved down to the next child.
I just adapted it to extend the life of my hems :)
Monday, October 29, 2012
A finished project
I'm back! Or at least I feel like I'm back :) even though I have been continuing to sew off and on for the last month, this weekend was very productive and felt like one of my old sewing weekends. Among a few other projects to follow, I finally finished the silver dress from last month! And I mean finished, like absolutely everything is done on it, which is rare for me as I feel like I am always tacking something down last minute ;)
While I had originally thought about decorating the skirt with big velvet swags, when I tried it I wasn't happy with the look.
So I went with a thin velvet band around the bottom, simpler and much better.
The buttons are little woven cord rounds, with the loops done in velvet cord to match the turn back collar and skirt trim.
And I made this little velvet belt with bow cause I just felt it needed a little more detail to feel complete.
While I had originally thought about decorating the skirt with big velvet swags, when I tried it I wasn't happy with the look.
So I went with a thin velvet band around the bottom, simpler and much better.
The buttons are little woven cord rounds, with the loops done in velvet cord to match the turn back collar and skirt trim.
And I made this little velvet belt with bow cause I just felt it needed a little more detail to feel complete.
Friday, October 26, 2012
Time to start collecting . . .
For Dickens fair that is. And the first few pieces to arrive are a shawl, a calling card case and a new set of boots.
The boots are from oak tree farms (http://www.oaktreefarms.com) and are wonderful, they have the right shaped heel and look and are well made.
Though they do run very small so go a size up.
These are the veil, but there are other really good looking boots for the Victorian era. I also want a pair of the Catherine's, they have a canvas upper and leather lowers.
Next is this cute little silver calling card case that will hold my money nicely and has a little ring at the top to hang from my chatelaine.
I have been watching lots of items on eBay for chatelaines. I would like a nice little sewing set to wear at fair as I am often mending something or the other for someone during the fair. I hoping for a scissor, pin cushion and needle case. Maybe a tape measure or thimble holder too :)
And last but not least is the shawl, and this was a really big score for me as I have badly wanted a Victorian paisley shawl since last year and they usually go for more than I am willing to spend. But finally after much patient searching I found one I liked and in good condition and was able to snag it in my price range!!
It's mostly black which I think will actually make it more versatile. And it's huge, it this picture it's folded into quarters and is taking up most of my full size bed :)
The boots are from oak tree farms (http://www.oaktreefarms.com) and are wonderful, they have the right shaped heel and look and are well made.
Though they do run very small so go a size up.
These are the veil, but there are other really good looking boots for the Victorian era. I also want a pair of the Catherine's, they have a canvas upper and leather lowers.
Next is this cute little silver calling card case that will hold my money nicely and has a little ring at the top to hang from my chatelaine.
I have been watching lots of items on eBay for chatelaines. I would like a nice little sewing set to wear at fair as I am often mending something or the other for someone during the fair. I hoping for a scissor, pin cushion and needle case. Maybe a tape measure or thimble holder too :)
And last but not least is the shawl, and this was a really big score for me as I have badly wanted a Victorian paisley shawl since last year and they usually go for more than I am willing to spend. But finally after much patient searching I found one I liked and in good condition and was able to snag it in my price range!!
It's mostly black which I think will actually make it more versatile. And it's huge, it this picture it's folded into quarters and is taking up most of my full size bed :)
Friday, October 5, 2012
A sewing update
I'm still here I promise, life has just gotten super busy lately!
I am still sewing, it's just that there is little that is noteworthy right now. I am finishing up the silver dress, setting the hem and the front closure (boring).
And I have started draping the next 1850s project which is a short fitted jacket. There wasn't a pattern I could find that would do what I had in mind so I am just making my own pattern. I spent the weekend draping and tacking and pinning and marking and readjusting and seam ripping and then repeating till my little fingers hurt! (tedious)
And because its fall (yes I know it was 100 degrees on Monday) I can't help myself but start crocheting again. I am making granny squares because they are quick, small counts and easy to carry with me.
See nothing noteworthy ;)
I am still sewing, it's just that there is little that is noteworthy right now. I am finishing up the silver dress, setting the hem and the front closure (boring).
And I have started draping the next 1850s project which is a short fitted jacket. There wasn't a pattern I could find that would do what I had in mind so I am just making my own pattern. I spent the weekend draping and tacking and pinning and marking and readjusting and seam ripping and then repeating till my little fingers hurt! (tedious)
And because its fall (yes I know it was 100 degrees on Monday) I can't help myself but start crocheting again. I am making granny squares because they are quick, small counts and easy to carry with me.
See nothing noteworthy ;)
Subscribe to:
Posts (Atom)