Monday, April 30, 2012

Regency - undergarments

I am now 95% finished with my undergarments. And thought to share my progress.

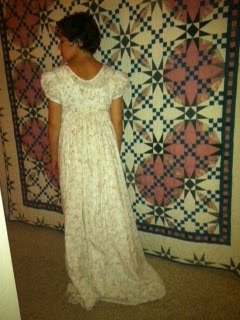
The chemise is complete, I made it out of a printed cream on white cotton.


I know it's not a period fabric but I had a lot of it in my fabric stash, left over from my grandmother's quilting collection. It won't matter as the chemise will not be seen by anyone. I chose to make the chemise longer then the pattern called for because I wanted as much coverage as possible for this era, and I also am not planning on making the period drawers often worn under Regency dresses.


The short stays were a great learning experience for me and I am happy with how they turned out. I chose to make them boned rather then corded or quilted simply for the quickness and ease of setting bones over the other more period options.


I also chose to detach the sleeves and tie them on through eyelets, because I have large shoulders and the attached sleeves never sit well on my form. The last thing remaining is to hand sew the eyelets for the front lacing and sleeve ties. Which I am slowly working through each night after other sewing. I am averaging 2 eyelets a night before I fall asleep ;)

I also opted to make a petticoat as the dresses are thin and I want to have a good full skirt. I might go back and cord it in the future but for now it is plain. I made it kind of like a jumper, with a bodice back but no front just a drawstring at the waist line to hold it in. Its simple, easy to wear and adds very little extra bulk. It is a design I had seen in another blog, only now I don't remember where and since i didn't save it i cant find it again to give that other costumer credit, sadly. 


Friday, April 27, 2012

Regency dress #2

Dress number two is now done! Two days two dresses, I am on a roll ;)

Same pattern for this dress as the last just different sleeve variation and fabric.

This one took the same amount of time if not a little less. Practice sure does seem to make perfect, or at least easier. Which is why I chose to use the same pattern for both as I knew I could move faster that way and of course I am in a huge time crunch!! I mean really when am I not in a time crunch ;)

Maddy modeled again for me :) no silly faces this evening though. 


Thursday, April 26, 2012

Regency dress #1

Okay back to our regularly scheduled projects!!!
The first regency dress is done. I started with the more plain printed linen one. 

I cut this dress out a few weeks ago, which is my least favorite part of the whole process. 

I am using the drawstring dress pattern by sense and sensibility. I chose it over her original gathered front dress as this is easier to get on and off by myself (no back closure). 

The dress went together really easily, as I have made this pattern once before. 

The bodice and sleeves go together first.

Then the skirt, which is then attached to the bodice.


Then cords are run through channels at the neck and waist to bring it together. The sleeves are elbow length and I am going to set a straight hem just above floor level as this dress will be more of a "working" dress. Though I will do the hem later when the other dress is done (hemming is another thing I hate having to do). 

I put my sister in the dress so that I could get photos of it for you :)

My sister used to be my dress form for the longest time till she finally got sick of being forced to stand still for long periods of time and stabbed with pins so she bought me a dress form for Christmas a few years back. I can still usually convince her to stand for photos but that doesn't keep her from being a goof ball about it :)


Her reenacting "pride prejudice and zombies" ;)

Wednesday, April 25, 2012

Renaissance Fair Reunion

Okay all, pictures have arrived!! Not as many as I would like but still something is better then nothing :)

The reunion was great, so many people showed up and in costume too! The court looked huge which made for some good views for the crowd I am sure :) 

Although the day was WAY TOO HOT for my taste!! 


Michael looking regal, I love his stance with his hand resting on his sword hilt :) don't mind my hand in the picture handing him a drink ;)


A shot of me :) the hat that i am wearing is Michael's original hat from when he was in court as a kid! I love that it survived and that I could wear it. Hats really are his specialty :)

My dress was one I had made a few years ago, it's from a simplicity pattern and is very easy to wear as it is all one big piece and closes up the front with hook and eyes.


Tuesday, April 24, 2012

Mink - another one :)

I seem to have a little addiction to vintage furs right now :) I recently snagged another mink stole. I found it on eBay and got it for a good price, I really like it because even though it's smaller, only 3 pelts, it's a lovely silver grey color. It has it's crocheted snap closure and it's little clip mouth.


Unfortunately the mink came from a smokers house and reek of old smoke. I have been trying different methods of airing them out as well as storing them in a separate box with lots of lavender. If anyone has any suggestions on getting smoke out of fur, I would love some help :)


Monday, April 23, 2012

Elizabethan court suit: the final score

The event has passed and I'm still here to talk about it! I actually survived ;) it was touch and go there at points but in the end it was a success.

Michael looked great! And everyone said so, he was getting compliments left and right. The colors and fabrics were very bright in the direct sun, and the ensemble held up very well to wear. The hat he made turned out gorgeous, it was a style that few others were wearing and it had such a great shape and perch to it :)

There was lots of last minute sewing!! Friday night we were up till 2am working and then got up Saturday morning at 5:30 to finish. (please note the 3 and half hours of sleep) I was still tacking things down in the car and at the fair while getting dressed ;)

Michael and I have already compiled a small list of things to change or do differently with it for next time. I want to shorten the collar on the under shirt so the ruff stands up more and tack the wrist ruffs to the sleeves so they don't slip during the day. I also want to open up the collar and set in a little buckram to hold it up and keep it from getting squished. And Michael requested tie tabs on the doublet and pants to hold everything together, his pants kept trying to slip down, had to stop and safety pin him together at one point ;)

I don't have any pictures to share yet but when they do show up I promise to share!

Friday, April 20, 2012

Elizabethan court suit round 2:

The end is near!!!! Tomorrow first thing actually. 

And I can actually say that I think I'll make it! I set the slashes in the doublet and closed up and finished the front seams. Button holes are done and I will sew the buttons on during the train ride north, happening in just a few minutes :)


The sleeves are done, was even able to decorate them. They are very rich looking and the detail will help counter act the plain wool of the rest of the suit. I'll set the sleeves into the doublet late this evening when I get home. 


Michael is working in his hat this evening, it sounds like it is going to look great though I haven't seen it yet. 

All in all I think I actually won this in the end after all, though I have to say it was very touch and go there for awhile ;)

Thursday, April 19, 2012

Elizabethan court suit round 1:

So my one good accomplishment on the suit over the weekend was the venetians. 


They pleated nicely into the waist band, the front fly closure was easy to set and is very secure and the material is so heavy they practically stand up on their own :) which means they are nice and puffy. 


The doublet came together okay, the fitting was time consuming and the material is hard to work with in small spaces because it is so heavy. 


But I managed to get it constructed and lined and I even boned the front pieces for extra structure. 

However there is still the slashing, sleeves and front closure . . . 

Wednesday, April 18, 2012

Swing Kids

My little sister and her friend got together and put together a minute long swing demonstration for their other friend history class project. The project was about the swing kids movement in pre WWII Gremany.


Maddy (on the right) and her friend jake (in the middle) learned how to "fake" swing last year when they were in the school play Grease. They learned how to do all the flips and spins together so while it's not a real swing step they look super showy.

I help Maddy get dressed for it. She's wearing one of my older vintage 40's dresses and I did her hair in a pin curl wave, which was all that could be done as she has super short hair otherwise. 


It was a fun little distraction this morning :)

Monday, April 16, 2012

Elizabethan court suit vs. me

Well after a VERY long weekend the fight stands at court suit 3 and me 1. It really threw a few doozies at me this weekend, including preventing us from attending the titanic picnic on Sunday.

However what is done looks great, and I have 5 days left to get it finished (in the hours of the evening after work).

Besides who needs sleep, totally over rated ;)

Happy Monday!

Friday, April 13, 2012

Teens era hairstyle

Since this weekend will be THE BIG WEEKEND for all titanic costume events I thought I would share my teens era hairstyle tutorial that I have used to much success :)

Last summer a tutorial was posted to one of the costuming groups I am a member of. At the time I had no use for it but thought it was very good, and on a subject I hadn't seen anything else on, so I saved to to one of my "things to remember" files for future reference. And low n behold here come all these Teens era events flooding in and I have the perfect little hair tutorial stashed in my "things to remember" folder! 

And what a great little tutorial it is! Simple, short and sweet! Very easy to follow and with a finished result that is period and sophisticated. I definitely recommend it!!  

http://edwardianpromenade.com/beauty/tutorial-lady-mary-inspired-hairstyle/ 

The girl doing the tutorial has very long hair, mine is shoulder length and pretty thick and I was able to duplicate the look just fine. 

I didn't use the hair rats as instructed, because I didn't have any with me, but will for sure next time.
Sadly at the event I first wore it to I never took my hat off, so the full effect of the hair was never realized :) this was the best shot of it I could get.

Thursday, April 12, 2012

New mink

I recently purchased a mink stole on eBay. It's made up of 5 whole mink, complete with heads, tails and feet. They have beautiful rich dark brown pelts. 


The mink are sewn together at points along the body. The lead head has a clamp mouth, it also has it's crocheted snap closure as well as long thin satin strips sewn to the inside of the end mink, I'm not 100% sure what they are for as I've never seen them before but I think they are to slip your arms through to help keep it on. 


I just love them I think they are gorgeous and am excited to wear them even if I don't have a good event for them yet :)

Tuesday, April 10, 2012

The cream walking parasol

On Sunday, after spending the majority of the weekend out of town and most of the day on the road, Michael sat down with the pieces of my cream walking parasol and put it together!!

He had to grind the end of the wooden parasol shaft down in diameter till it was the same, if not a little smaller then the handle, in order to get the handle to fit on properly and securely. It was slow work and he took his time to be careful and make sure that he narrowed it evenly. The end result is fabulous, totally stunning, I am very happy with the way it came out! And I really appreciate all the time and effort he put into it!!

The parasol is going to be so much fun, and such a great period accessory. I love the contrast between the cream canopy and handle and the golden of the wood. The handle is also very slim and so the whole thing is very delicate and elegant. I'm very excited to get to use it this weekend for the Titanic Centennial Commemoration Picnic  at the Lanterman House, so be prepared for more pictures :)

Monday, April 9, 2012

Now to interrupt our regularly scheduled projects

. . . To bring you a mens Elizabethan  court suit, in just 12 days!! (oh crap) "deep calming breathes" 

So to add to all the chaos that is the month of April ( regency wardrobe, men's drop front breeches, 1930s ballgown, 1930s beach play outfit . . . Breath!) i will now be making a court suit for Michael to wear to the southern renaissance reunion. The only saving grace to this event is that my Elizabethan court dress is complete, just have to drag it out of storage, wave it past the steam wand and lace myself in :)

Last weekend Michael chose a style and color scheme. This was the inspiration he was working off of: 

He settled on a pointed doublet with long tabs and Venetians in a bottle green heavy wool. The doublet will be slashed  and with a gold silk velvet puff, the sleeves will be in the same gold velvet. I'm also making him a linen shirt, he's making his own hat. Hats are his specialty, he makes really incredible reproduction military hats and can copy just about any other style. 

The linen shirt was actually cut out last weekend and so I was able to sew it over the weekend. Even though we were not in town, the friends we were staying with let me borrow their machine :) I used a simplicity pattern for the shirt, it's not too terribly non period, though very simple to construct, and it won't matter much especially when all you will see is the collar and cuffs. 

It still needs its eyelets and draw cord to close the front and buttons for the cuffs. I'm going to hand sew the eyelets again as I actually enjoyed the experience from my ballgown. (crazy I know but it gives me something easy to work on while riding the train)   

The Venetians are cut out now too and I will work on them this week after work. I hope to have them done by Friday so that I can focus on the doublet over the weekend as it will be far more difficult and time consuming.  Actually it scares me quite a lot as I have never attempted to slash anything before, so the whole thing will be a new learning experience for me!

Friday, April 6, 2012

Gussets - practice makes perfect

As part of the regency project I am making a pair of short stays. All regency stays require gussets, a sewing technique I have not yet tried. From Wikipedia: In sewing, a gusset is a triangular or rhomboid piece of fabric inserted into a seam to add breadth or reduce stress from tight-fitting clothing. 

Since I am making the Sense And Sensibility underpinnings, I followed her instructions for setting in the gussets for the front pieces and my first attempts were disastrous to say the least.
Some practice made it a little better but I was no happier with the results.
So I started looking for outside sources of instruction and naturally ended up at the Oregon Regency Society blog where they had a great post with these instructions on how to set a gusset.

It was just how I needed to hear it to get it right. 

I was able to set the gussets smoother with out any gapping or holes. I really recommend this ORS blog post (http://oregonregency.blogspot.com/2010/06/overview-of-regency-stayscorsets.html?m=1) it also discusses how to fit regency stays and which type of stay is good for your body type. 

The other step I did that was very helpfully was after i cut out the gussets and made the cuts in the front piece I used fray check on all the raw edges. This helped keep the corners from shredding.

Now on to finishing the stays :)

Thursday, April 5, 2012

The Cupcake - post project notes

So the dress is done and the event has passed! 

And I thought i would do a little analysis of how it went:

The dress was a hit for sure and it was fun to wear :) 

For starters: next time I'm going to start a project this big, sooner and procrastinate less (don't laugh at me, I'm really going to try to get better about that, I promise :)

I loved the trim I did to the skirt, trim in self fabric for the victorian era is so key. And I was proud of all the ruffling and gathering I did (to toot my own horn a little). 

However, Next time I would use a little stronger thread for tacking down the details. I had a flower pop off that had to be  pinned back on and one of the loops on my bow popped too and so it hung a little droopy all evening. Also though I was really happy with the overall shape of the skirts I achieved using a small cage and a bustle pad next time I think I want the pink under skirt to go over the cage alone and put the bustle pad over that yet under the white over skirt to get that super poof that the fashion plate has. 

The hair was great and super easy as it was all fake hair pieces just pinned in over my hair pulled up in a bun. And a single flower to tie it in with the dress. I loved the big double sausage curls set to hang over one shoulder, they were fun and bouncy :)

Overall I think it was a great success and a wonderfully challenging project to me, in both design and color combination. 

Tuesday, April 3, 2012

SDI Spring Ball

Two Saturdays ago was the Spring SDI ball. This event represents a special occasion for Michael and I as it is where we met. 


The ball was wonderful as always, the organizers have mastered the art of these balls and they are always so well put together and hosted, this year being no exception. 

We shared the evening with many of our friends, including a few who came in from out of town for the event. The ball was well attended and the floor was a constant flurry of rich fabrics and vibrant colors. 


SDI balls are perfect for new dancers or those just breaking into period dancing as they always offer a dance class the weekend before the event and have one of the hosts calling each set dance. 


The next ball will be in June at the same lovely hall.

We had a wonderful time!! So much fun to get to dress up an dance :)